

BDD tutorial#
Create your first BDD test end to end: define it in JIRA, export the feature file, implement the steps with pytest-bdd, and publish the results back to a requirement.
This tutorial works entirely in the XSB project — the XRay Sandbox — so you can practise every step, including the upload, without touching production verification data. The sandbox holds a complete worked example to compare against: Requirement XSB-40, Test Set XSB-41, Tests XSB-38 and XSB-39, and Test Plan XSB-37. The snippets below use the worked example’s keys; substitute your own where they differ. Read How BDD testing works first if you want the concepts before the mechanics.
Once you know the workflow, use BDD how-to guides for individual tasks and BDD reference for syntax and configuration details.
Before you start#
You need:
A JIRA account with permission to create issues in the XSB project
A GitLab repository that includes the
.makesubmodulePython 3.10 or later, with
pytest,pytest-bdd, andpytest-covavailable in your test environment
Choose the requirement#
Every BDD test hangs off a requirement or Feature, which is what gives it traceability. Real verification work starts from a requirement in the L1, L2, IFID, or VTS projects; if no suitable requirement or feature existed, you would create one and label it with the PI (Program Increment) in which you plan to implement it.
For this tutorial, use the sandbox requirement XSB-40. Its Requirement Status field is what your tests will drive. Note the requirement key — you need it in the next step.
Create the Test Set#
A Test Set groups the tests that together verify one requirement.
Create a JIRA issue of type Test Set in the XSB project
Give it a title describing what the group of tests verifies, for example
Configure subarray for imaging scanIn the link field, link the Test Set to XSB-40 using the tests relationship
Note
Linking from the requirement instead of the Test Set works too, but the relationship is named tested by in that direction.
JIRA assigns your Test Set the next free key. In the worked example this is XSB-41 — open it and the requirement to compare the links with yours.
Write your first test#
Now create the individual test that the Test Set will contain.
Create an issue of type Test in the XSB project
Title it after the behaviour it checks, for example
Configure subarray with valid parametersClick the Test Details tab
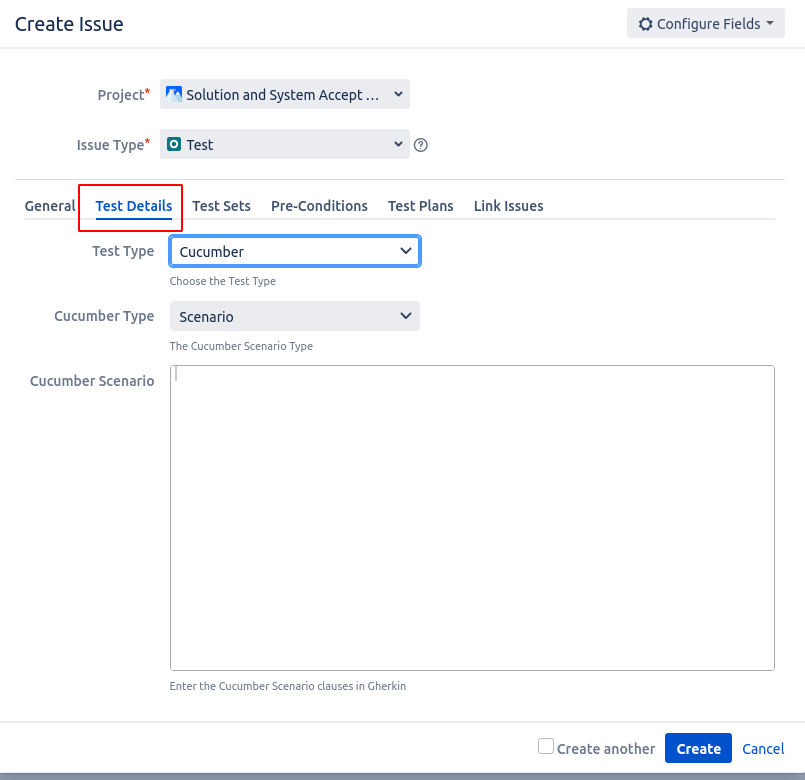
Then fill in the test details:
Test type: Cucumber
Cucumber type: scenario
Cucumber scenario: your Gherkin steps
For this example — the worked example’s XSB-38 — write:
Given the telescope is in STANDBY state
And I have a valid configuration file
When I send the Configure command
Then the subarray enters READY state
Finally, link the test to your Test Set.
Tip
Before writing a new step, search the XRay step library for an existing one that says the same thing. Reusing a step phrase means reusing its implementation code as well.
Repeat this step for each behaviour you want to verify. A complete Test Set covers the
unhappy paths too — the worked example adds XSB-39, Handle invalid configuration.
Export the feature file#
With the tests defined, export them as a Cucumber feature file:
Open your Test Set
Open the More dropdown menu
Select Export to Cucumber
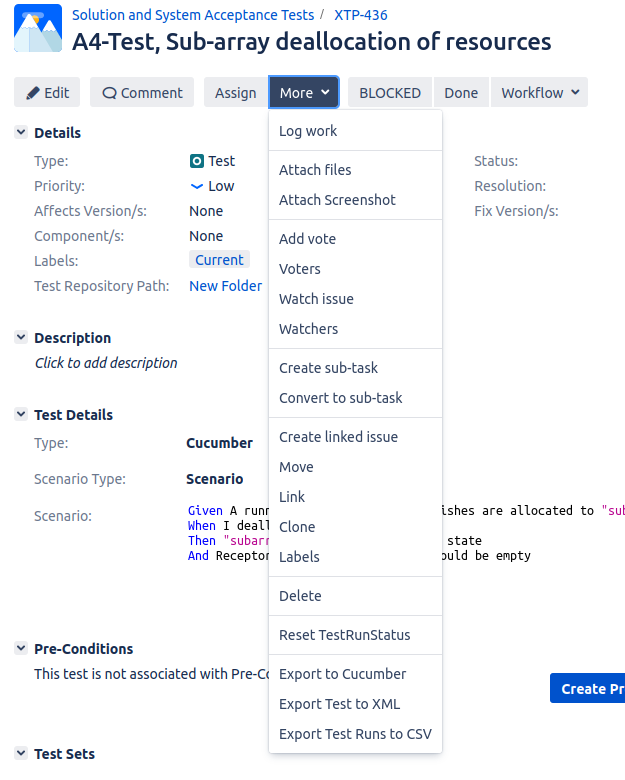
Save the resulting .feature file. Its contents look like this — note that JIRA has tagged
the feature and each scenario with its ticket key, which is what links results back to the
requirement:
@XSB-41
Feature: Configure subarray for imaging scan

  @XSB-38
  Scenario: Configure subarray with valid parameters
    Given the telescope is in STANDBY state
    And I have a valid configuration file
    When I send the Configure command
    Then the subarray enters READY state

  @XSB-39
  Scenario: Handle invalid configuration
    Given the telescope is in STANDBY state
    When I send an invalid configuration
    Then the subarray returns an error
    And the subarray remains in STANDBY state
Export each Test Set you want to exercise.
Add the feature file to your repository#
Commit the .feature file to the repository that holds the code under test. Keep feature
files close to the test code but separate from it, so they are not mistaken for test modules:
tests/
└── bdd/
    ├── features/
    │   └── XSB-41.feature
    └── test_subarray_configure.py
Implement the step definitions#
Each Gherkin step needs a Python function. The example below implements the steps against a
small fake subarray so the test runs anywhere; in a real project, the steps drive your test
harness or Tango devices instead. Load the scenarios, then annotate one function per step —
note that the shared Given runs for both scenarios:
"""BDD tests for configuring a subarray (XSB-41)."""

import pytest
from pytest_bdd import given, when, then, scenarios

# Load every scenario in the feature file
scenarios('features/XSB-41.feature')


class FakeSubarray:
    """Stand-in for the real device, so the tutorial runs anywhere."""

    def __init__(self):
        self.state = 'STANDBY'

    def configure(self, config):
        if config.get('valid'):
            self.state = 'READY'
            return None
        return 'invalid configuration'


@pytest.fixture
def context():
    """Share state between steps."""
    return {}


@given('the telescope is in STANDBY state')
def telescope_standby(context):
    """Start the subarray in the invariant initial state."""
    context['subarray'] = FakeSubarray()


@given('I have a valid configuration file')
def valid_configuration(context):
    """Load a known-good configuration."""
    context['config'] = {'valid': True}


@when('I send the Configure command')
def send_configure(context):
    """Configure the subarray."""
    context['subarray'].configure(context['config'])


@when('I send an invalid configuration')
def send_invalid_configuration(context):
    """Configure with a known-bad payload, keeping the error."""
    context['error'] = context['subarray'].configure({'valid': False})


@then('the subarray enters READY state')
def subarray_ready(context):
    """Check the resulting state."""
    assert context['subarray'].state == 'READY'


@then('the subarray returns an error')
def subarray_error(context):
    """The invalid configuration is rejected."""
    assert context['error'] is not None


@then('the subarray remains in STANDBY state')
def subarray_still_standby(context):
    """Rejection leaves the state untouched."""
    assert context['subarray'].state == 'STANDBY'
Because the given steps describe general conditions, other tests can reuse them — both
scenarios above share one. Move shared steps into a conftest.py so every test module in
the directory picks them up — see BDD how-to guides for that pattern.
For worked examples in a real repository, see the ska-sdp-lmc test suite.
Run the test#
python-test comes from the pipeline machinery, and the report flag makes every run write
the Cucumber JSON that JIRA needs later. Add both to your Makefile:
include .make/base.mk
include .make/python.mk
include .make/xray.mk

PYTHON_VARS_AFTER_PYTEST = --cucumberjson=build/reports/cucumber.json
Then run your BDD tests through the machinery, so the local run matches CI:
make python-test PYTHON_TEST_FILE=tests/bdd
pytest-bdd reports each scenario as a test — two passes here. Fix any failures before wiring
up the JIRA upload. The run also wrote build/reports/cucumber.json; you need it next.
Publish results to JIRA#
Publishing turns a passing test run into verification evidence on the requirement.
Generate the execution configuration, bound to the sandbox Test Plan XSB-37 and project, and commit it:
xray-generate-configuration -c charts/<your-chart>/Chart.yaml -t XSB-37 -p XSB
Because the sandbox exists for practice, you can run the upload once by hand to watch the tickets update — set up a personal API token as described in BDD how-to guides, then:
make xray-publish
XRay creates a Test Execution in the sandbox, updates XSB-38 and XSB-39, and rolls the result up to Requirement XSB-40.
For a real project, let the pipeline do this instead by including the XRay CI template in
.gitlab-ci.yml:
include:
  - project: 'ska-telescope/templates-repository'
    file: 'gitlab-ci/includes/xray-publish.gitlab-ci.yml'
Warning
Outside the sandbox, enable the upload only on the main/master branch, and only in repositories doing significant integration work. Running it on every branch generates thousands of Test Execution tickets.
See BDD reference for every variable the target accepts.
Next steps#
Extend your sandbox Test Set with more unhappy paths — timeouts, recovery — and re-export
Do it for real: link a Test Set to a real requirement, keeping the JIRA upload on the main/master branch of integration repositories only
Write feature files straight from the repository and register them in JIRA with the ska-ser-xray tooling — see BDD how-to guides
Read How BDD testing works for guidance on writing Gherkin that stakeholders can act on