Getting Started
Before you begin
The documentation for SKAMPI is currently being reworked. To look at the documentation that was available before this rework started, please go to this temporary build on ReadtheDocs.
For information on how to use the subsystems / components that are deployed using SKAMPI, please first look at the documentation on SKAMPI Subsystems
If you’re developing (or planning to develop or contribute to) a component or subsystem that is to be integrated in a Kubernetes cluster, read on. If you are a tester, it is also recommended that you gain at least a basic understanding of the concepts before jumping to the section on Testing.
SKA Tango Examples and Tango Images
If your component or product is ready for integration, skip the following sections and go to Development.
A basic understanding of the SKA Tango Examples repository is required before attempting to integrate a component on SKAMPI. Please clone the repository and base your development on the examples given there. Pay particular attention to how deployment and partial integration is demonstrated using Helm. It will be helpful to follow the SKAMPI Documentation on Helm while you are doing this. There are also links to the documentation on Container Orchestration which you should also follow.
The SKA Tango Base and Tango Util Helm charts are required by most of the deployments that are integrated in SKAMPI. It is therefore also worth your while to look at the SKA Tango Images repository. The deployment workflow is very similar to SKAMPI.
Deployment
Makefile Targets
Deployment of SKAMPI is supported by Make targets, exactly as is the case with SKA Tango Examples. To check which targets are available and what default values are set for variables used by Make, run
$ make
Environment Settings
To check what some of the most commonly used variables are that your Makefile will use when you run any commands (defaults or environment specific), you can run
$ make vars
This should give you all the basic environment variables needed to run the make commands as they are called in CI jobs, in case you want to debug deployment issues. For more information see the section on CI Pipeline Deployment.
Local Minikube / Dedicated Server Deployment
The full deployment of SKAMPI is currently very resource intensive and therefore we recommend that you rather use the CI Pipeline Deployment methods provided. If you want to deploy SKAMPI locally or on a dedicated server, first install Docker, Minikube and Helm (note that Helm is installed alongside with Kubectl when you use the SKA Minikube Deployment repository).
A Minikube cluster is a kubernetes cluster with only one node (your laptop is called a node), which acts as the master and worker node. The SKA Minikube repository also provides an ingress to expose your cluster’s deployment to the outside world if needed, and other settings (see the documentation in the repo for more details). Once these prerequisites are installed, you can follow the guidelines on Deployment. Note that a partial deployment of SKAMPI is made possible by setting the <subchartname>.enabled value to false in the values.yaml file of the repository, for any component (represented by a subchart) that can be switched off to save resources. Details can be found in the Deployment guidelines.
CI Pipeline Deployment
Installation/Deployment of SKAMPI is much simpler using the Gitlab CI Pipelines (and this is the recommended method), as everything required to set up the environment is included in the CI infrastructure. As all branches should be named after a Jira ticket, you need a Jira ticket before checking out your branch.
Start by cloning the SKAMPI repository to your local machine. If you don’t use SSH (or don’t know what that even means), use the following command:
$ git clone https://gitlab.com/ska-telescope/ska-skampi.git
$ cd ska-skampi
Let’s say your ticket is AT-42. Check out your branch (do this from the root directory of the SKAMPI project)
$ git checkout -b at-42
Switched to a new branch 'at-42'
Now push this new branch to Gitlab:
$ git push --set-upstream origin at-42
Total 0 (delta 0), reused 0 (delta 0), pack-reused 0
remote:
remote: To create a merge request for at-42, visit:
remote:   https://gitlab.com/ska-telescope/ska-skampi/-/merge_requests/new?merge_request%5Bsource_branch%5D=at-42
remote:
To gitlab.com:ska-telescope/ska-skampi.git
 * [new branch]        at-42 -> at-42
Follow the Documentation for deploying in a namespace, and then downloading and using the KUBECONFIG file. This file is your key to accessing the namespace in the cluster where your branch has just been deployed.
VSCode Kubernetes
There are multiple ways to access your cluster. With the Kubernetes plugin installed in VSCode, you can set your VSCode to access the namespaced deployment. Follow the above-mentioned documentation and set your cluster to the KUBECONFIG file provided.
Minikube
For a local installation of a Minikube cluster, we recommend you use the SKA Minikube Deployment repository - see link below.
Docker
For installing Minikube, you first need to install Docker - follow these instructions.
Minikube setup
To set up your Minikube cluster for local SKAMPI deployment, follow the instructions provided in the SKA Minikube Deployment repository. For first-time setup, do the following:
$ git clone git@gitlab.com:ska-telescope/sdi/ska-cicd-deploy-minikube.git
$ cd ska-cicd-deploy-minikube
$ make all
$ eval $(minikube docker-env)
Please note that the command eval $(minikube docker-env) will point your local docker client at the docker-in-docker for minikube. Use this only for building the docker image and another shell for other work.
Once your minikube cluster is running, you can deploy SKAMPI using the make commands (see below). First check that your Minikube is running:
$ minikube status
minikube
type: Control Plane
host: Running
kubelet: Running
apiserver: Running
kubeconfig: Configured
Now install SKAMPI. Take note: all default values of variables will be used if none are set. Read more about this under Modifying deployment configuration.
$ cd .. # this is to go back to the root of the SKAMPI repo after the above commands
$ make install-or-upgrade
$ make wait
$ make links
Once make wait finishes, you can run make links and follow the URL given to check if you can access the deployed software.
Helm Charts
Installation of Helm should be done as part of familiarising with SKA Tango Examples. This will also help you getting familiar with what a Helm Chart is.
Helm Charts are basically a templating solution that enables a large project such as the SKA to configure a set of standard kubernetes resources using configuration parameters. A Chart is essentially a folder with a general structure, which can be packaged in a .tar.gz file and published to a Helm Repository, or used locally for deployment.
For an understanding of how Helm Charts are used in the SKAMPI project, please go to the section on Templating the Application under the Container Orchestration Guidelines of the Developer Portal.
Development
The following sections are aimed at developers who want to integrate their products/components, or who want to add integration or system-level tests to the repository.
Adding a new product/component
This is an example of how the deployment would look, if a new application (“Application three”), were to be added to the minimal deployment described in the section on Modifying deployment configuration:
Using the example repositories and SKAMPI as a guide should prove useful. More information to follow here. ..todo
Modifying deployment configuration
To override local environment variables used by the Makefile, you can either export them (they will only persist for the current shell session), or create a file in the root of the project called PrivateRules.mak.
:warning: In this section, the assumption is made that you have deployed Minikube as described above, and are deploying for local development and testing purposes.
Local overrides for Make and Helm variables
Test the effect of changes to the environment / Make variables by following these steps:
First check the current value (according to
Make), of theMARKvariable (the variables listed below, and their defaults, may change over time):$ make vars SKA_K8S_TOOLS_DEPLOY_IMAGE= KUBE_NAMESPACE=integration ...snip... MARK=
In the above example,
MARKis empty. If this is your first time using the repo, that’s to be expected.Now set it for the current shell and check the value of
MARKagain:$ export MARK=ping $ make vars | grep MARK MARK=ping
Next, reset the
MARKvariable, create aPrivateRules.makfile and set the value forMARK:$ export MARK= $ make vars | grep MARK MARK= $ echo MARK=ping >> PrivateRules.mak $ make vars | grep MARK MARK=ping
Set the host to point to your local machine
If you deployed Minikube as per the above, your HAProxy frontend will expose your Nginx to your browser at the IP address given in the output near the end of the make all or make minikube command:
...snip...
# Now setup the Proxy to the NGINX Ingress and APIServer, and any NodePort services
# need to know the device and IP as this must go in the proxy config
Installing HAProxy frontend to make Minikube externally addressable
MINIKUBE_IP: 192.168.64.12
Adding proxy for NodePort 80
Adding proxy for NodePort 443
The MINIKUBE_IP variable should be given to your Makefile. Copy that IP address and set the value of the INGRESS_HOST in PrivateRules.mak to this variable. For instance, if the IP address was output as 192.168.64.12 (above example), you can do this:
$ echo INGRESS_HOST=192.168.64.12 >> PrivateRules.mak
This will help reaching the NodePort services (see reaching the landingpage further on).
Control the deployment with VALUES and values.yaml
Check the rest of the PrivateRules.mak variables. Notice that there is a VALUES parameter, by default set to values.yaml:
$ make vars | grep VALUES
VALUES=values.yaml
The values.yaml file controls all the variables that are used by Helm when interpreting the templates written for each of the Charts. In other words, if you want to modify the deployment of SKAMPI in any way, the simplest method would be to modify the appropriate variables in your own yaml file, and tell Make about this file. As a convenience, there is already a yaml file specified in .gitignore, so that you won’t unnecessarily commit your local file.
Set your
VALUESto this file and populate this file with a harmless default and check that Helm doesn’t complain:$ echo VALUES=my_local_values.yaml >> PrivateRules.mak $ echo am_i_awesome: true >> my_local_values.yaml $ make template-chart helm dependency update ./charts/ska-mid/; \ helm template test \ --set ska-tango-base.xauthority="" --set ska-oso-scripting.ingress.nginx=true --set ska-ser-skuid.ingress.nginx=true --set ska-tango-base.ingress.nginx=true --set ska-webjive.ingress.nginx=true --set global.minikube=true --set ska-sdp.helmdeploy.namespace=integration-sdp --set global.tango_host=databaseds-tango-base-test:10000 --set ska-tango-archiver.hostname= --set ska-tango-archiver.dbname=default_mvp_archiver_db --set ska-tango-archiver.port= --set ska-tango-archiver.dbuser= --set ska-tango-archiver.dbpassword= --values gitlab_values.yaml \ --values my_local_values.yaml \ ./charts/ska-mid/ --namespace integration; Hang tight while we grab the latest from your chart repositories... ...Successfully got an update from the "skao" chart repository ...Successfully got an update from the "skatelescope" chart repository Update Complete. ⎈Happy Helming!⎈ Saving 11 charts Downloading ska-tango-base from repo https://artefact.skao.int/repository/helm-internal Downloading ska-tango-util from repo https://artefact.skao.int/repository/helm-internal Downloading ska-mid-cbf from repo https://artefact.skao.int/repository/helm-internal ... snip ... Deleting outdated charts # after a bit of waiting, suddenly lots of output appears.You now have a values file that overrides the local deployment without affecting the repository. If you want to create a minimal deployment, you can now switch off all the components deployed by Helm.
Copy all the settings below into
my_local_values.yamlminikube: true am_i_awesome: true ska-tango-base: vnc: enabled: false ska-mid-cbf: enabled: false ska-csp-lmc-mid: enabled: false ska-sdp: enabled: false ska-tmc-mid: enabled: false ska-oso-scripting: enabled: false ska-webjive: enabled: false ska-ser-skuid: enabled: false landingpage: enabled: false ska-tango-archiver: enabled: false
NOTE: this can hardly be called a deployment of SKAMPI, as no component is deployed at all. This example is only intended to show how the deployment can be controlled using Helm chart values. The entire SKAMPI cannot be easily deployed on a laptop at the time of writing. Updates to requests & limits for the components of SKAMPI are needed, in order to make the deployment less bloated. Developers of components must follow the Documentation for setting resource limits & requests for their charts. Use the Monitoring dashboards available for properly gauging the resource usage of components.
In a new terminal, watch the deployment settle with
kubectl(the below snapshot of statuses should change as the deployment settles down. Prependingwatchto thekubectlcreates the watcher - exit it by hitting Ctrl+C.). Assuming you didn’t modify the name of the namespace (fromintegrationto something else) inPrivateRules.mak:$ watch kubectl get all -n integration NAME READY STATUS RESTARTS AGE pod/databaseds-tango-base-test-0 0/1 ContainerCreating 0 18s pod/ska-tango-base-tango-rest-86646c966-5svhr 0/1 Init:0/5 0 18s pod/ska-tango-base-tangodb-0 0/1 ContainerCreating 0 18s pod/tangotest-config-cbkxj 0/1 Init:0/1 0 18s pod/tangotest-test-0 0/1 Init:0/2 0 18s NAME TYPE CLUSTER-IP EXTERNAL-IP PORT(S) AGE service/databaseds-tango-base-test NodePort 10.99.68.66 <none> 10000:30397/TCP 19s service/ska-tango-base-tango-rest NodePort 10.106.95.48 <none> 8080:31500/TCP 19s service/ska-tango-base-tangodb NodePort 10.108.17.5 <none> 3306:31278/TCP 19s service/tangotest-test ClusterIP None <none> <none> 19s NAME READY UP-TO-DATE AVAILABLE AGE deployment.apps/landingpage 0/1 1 0 19s deployment.apps/ska-tango-base-tango-rest 0/1 1 0 19s NAME DESIRED CURRENT READY AGE replicaset.apps/ska-tango-base-tango-rest-86646c966 1 1 0 18s NAME READY AGE statefulset.apps/databaseds-tango-base-test 0/1 18s statefulset.apps/ska-tango-base-tangodb 0/1 18s statefulset.apps/tangotest-test 0/1 18s
Above deployment is pretty useless and will not pass any tests, but illustrates how a small deployment can be made. You now have the ability to add components to the deployment, by modifying their
enabledvariables. Let’s test that out, and just re-introduce the Landing Page:Enable the Landing Page by setting
landingpage.enabledtotruein themy_local_values.yamlfile:landingpage: enabled: true
Now update the deployment:
$ make install-or-upgrade
You should now see the landing page being added to the cluster:
$ kubectl get all -n integration -l app=landingpage    # the -l app=landingpage is to filter for anything that is labelled app=landingpage
NAME                             READY   STATUS    RESTARTS   AGE
pod/landingpage-5f95cdff-26mqc   1/1     Running   0          27m

NAME                  TYPE        CLUSTER-IP       EXTERNAL-IP   PORT(S)   AGE
service/landingpage   ClusterIP   10.106.182.252   <none>        80/TCP    27m

NAME                          READY   UP-TO-DATE   AVAILABLE   AGE
deployment.apps/landingpage   1/1     1            1           27m

NAME                                   DESIRED   CURRENT   READY   AGE
replicaset.apps/landingpage-5f95cdff   1         1         1       27m
You should now be able to get an output of the landingpage by running
make links:$ make links ############################################################################ # Access the landing page here: # https://192.168.64.12/integration/start/ ############################################################################
Clicking on this link should open the landing page.
Verifying Chart versions deployed by Helm
The landing page holds a list of versions of the Charts that are deployed. This list is generated at deploy-time, taking into account the enabled and disabled items. This should give an indication of what should be deployed. :warning: NOTE: This is not a list of successfully deployed items, but merely a list of items that should be expected to run. Further investigation is required if subsystems are unexpectedly not functioning.
For the above deployment, when you click on About >> Version, you’ll see only the three sub-charts that were deployed, the umbrella chart (in SKAMPI we only have Mid and Low umbrella charts), and their versions, for example:
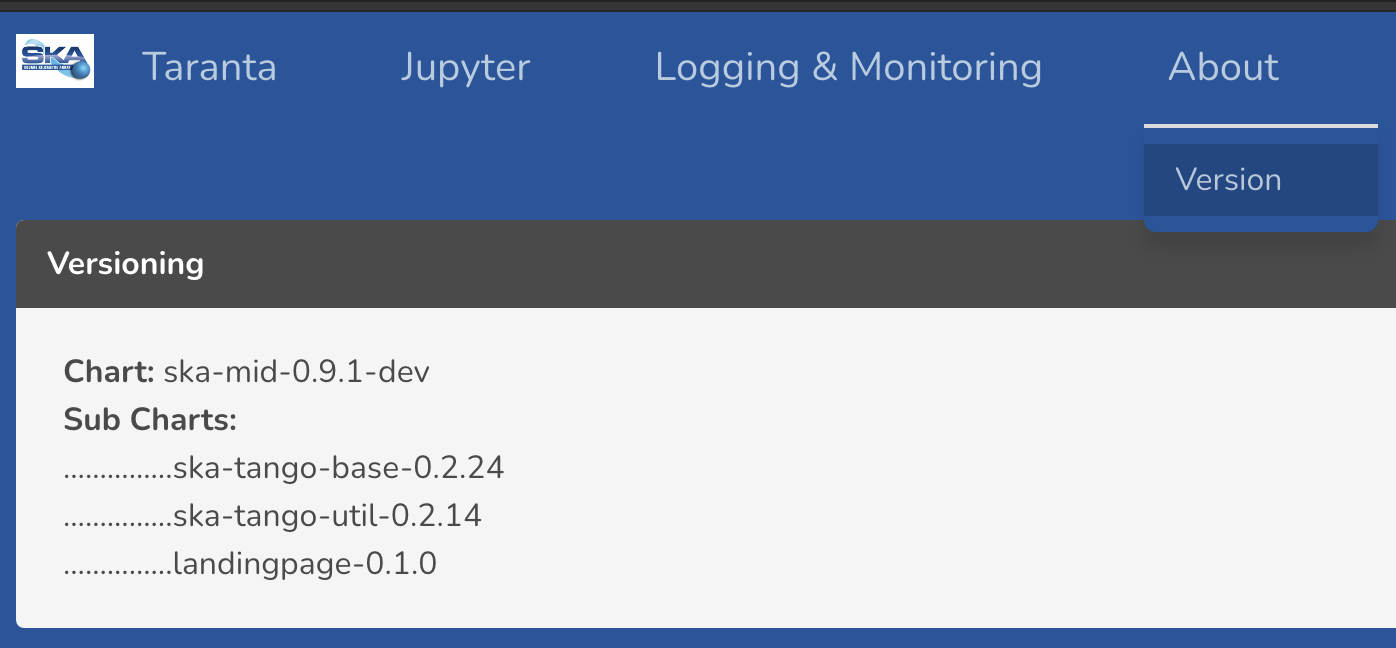
This means that the Taranta link should result in a 404 error, even though it is available.
Testing
While running SKAMPI on a local Minikube, the following steps can be carried out to see if your setup can test SKAMPI.
Install the Python
kubernetespackage in your virtual environment
python3 -m venv venv && . venv/bin/activate && pip3 install --upgrade pip
python3 -m pip install kubernetes
Run the test suite from a pod deployed in the cluster (using
MARK=pingwill limit your test to only one).
make k8s_test MARK=ping
Use the MARK parameter to run specific tests. All tests are marked with a @pytest.mark.<some-test-marker>, and by specifying the MARK variable by <some-test-marker>, you tell pytest to only run those tests. Note that this test will fail for the deployment described above, as there is no central node deployed.
More information should be available in the Documentation.
Troubleshooting / FAQ
Finding issues with SKAMPI deployments can sometimes be difficult, and knowledge of Kubernetes and Tango are essential. Some excellent troubleshooting tips for Kubernetes can be found at https://kubernetes.io/docs/tasks/debug-application-cluster/troubleshooting.
Getting Help
If you get stuck, the SKA Slack channels related to the technology that you are working on, are good places to go. These are a few useful channels:
#help-kubernetes
For help with Kubernetes related issues.
#help-gitlab
Struggling with CI or other Gitlab related things? Go here.
#proj-mvp
This is the channel where (in general) the current progress of the MVP is discussed, as well as integration issues on SKAMPI.
#team-system-support
The System Team help out whenever there are CI related problems that seem to be out of developers’ control.