Getting Started
This guide walks developers and operators through the quickest route to a
running instance of ska-octopus-backend.
Kubernetes deployment (official SKAO path)
Kubernetes plus Helm is the supported deployment path at SKAO. Start here if
you are shipping to any shared cluster.
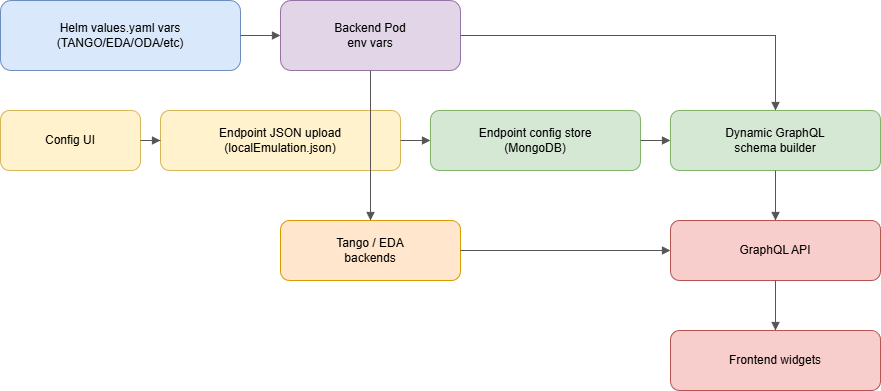
Octopus ships without Tango/EDA connections by default so it can stay agnostic
to the backends used in each environment. The steps below guide you through
setting the required vars and loading a pre-built Tango endpoint definition
through the Config UI.
Prerequisites
Helm 3 and kubectl.
Access to the target cluster namespace.
Secrets for JWT, Config UI, auth users, and optional EDA connectivity.
1. Create an environment values overlay
Start from charts/ska-octopus-backend/values.yaml and create a
values-<site>.yaml overlay that updates the backend vars for your site.
Warning
Do not deploy with the default vars values. They point at test services and
will break Tango, EDA, and ODA-backed resolvers in real clusters.
Minimum site-specific updates usually include:
Tango connectivity:
vars.TANGO_DBSfor widget endpoint selection andvars.TANGO_HOSTfor direct Tango access.EDA (HDB++) DSN: update
vars.HDBPP_PG_DSN_EDAsecret name/key or value.ODA endpoint:
vars.ODA_URL.MongoDB connection:
vars.MONGO_URI.Auth/egress:
vars.JWT_SECRET,vars.ALLOWED_ORIGINS,vars.WIDGET_ARTEFACT_BASE(if your registry differs).
Example overlay:
vars:
  TANGO_DBS:
    - value: "http://tangogql-primary.example.org/db"
      label: "Primary Tango DB"
    - value: "http://tangogql-secondary.example.org/db"
      label: "Secondary Tango DB"
  TANGO_HOST: "databaseds.octopus.svc.cluster.local:10000"
  ODA_URL: "http://oda.example.org/oda/api/v7"
  MONGO_URI: "mongodb://octopus-mongo:27017"
  JWT_SECRET:
    secretName: octopus-jwt
    secretKey: token
  HDBPP_PG_DSN_EDA:
    secretName: octopus-eda-readonly-postgresenv
    secretKey: HDBPP_PG_DSN
2. Create or reference required secrets
Create secrets that match your values overlay. For example:
kubectl -n octopus create secret generic octopus-jwt \
  --from-literal=token='replace-me' \
  --dry-run=client -o yaml | kubectl apply -f -

kubectl -n octopus create secret generic octopus-config-ui-password \
  --from-literal=cfg-ui-password='replace-me' \
  --dry-run=client -o yaml | kubectl apply -f -
Swap replace-me for production values. Update secretKey if you use a
different key name when creating the secret.
3. Install or upgrade with Helm
helm upgrade --install ska-octopus-backend ./charts/ska-octopus-backend \
  --namespace octopus \
  -f values-<site>.yaml
4. Verify the endpoints
GraphQL Explorer:
https://<ingress-host>/<base-path>/graphqlConfig UI:
https://<ingress-host>/<base-path>/config-ui
5. Load endpoint definitions (Tango + EDA)
To connect to Tango and EDA-backed resolvers, load the endpoint definitions through the Config UI. This seeds the backend with the example endpoint configuration.
Example for Minikube with chart defaults:
Config UI URL:
https://192.168.49.2/integration-octopus/ska-octopus-backend/config-uiLogin with the password stored in
octopus-config-ui-password.Import the default endpoints file:
https://gitlab.com/ska-telescope/ska-octopus/ska-octopus-suite/-/blob/main/endpoints/localEmulation.json
Local development (optional)
Prerequisites
Python 3.10+ and Poetry 1.8.
MongoDB 5+ (a local Docker container works well for development).
Access to Tango services if you plan to exercise Tango-backed GraphQL endpoints (
TANGO_DBS,TANGO_HOST).Optional: PostgreSQL HDB++ instances for historical data resolvers.
First run in five steps
Install dependencies
poetry env use 3.11
poetry install --with dev,test
Start required backing services (example using Docker):
docker run -d --name octopus-mongo -p 27017:27017 mongo:6
Create a
.envfile. The project README ships a full example; at minimum provideJWT_SECRET,MONGO_URI, and Tango endpoints if your resolvers depend on them.Launch the API with auto-reload:
poetry run uvicorn main:app --reload --host 0.0.0.0 --port 8000
You can also run
poetry run python main.pyto mimic the container entry point.Browse the surfaces:
GraphQL Explorer: http://localhost:8000/graphql
Config UI (password login + CSRF): http://localhost:8000/config-ui
OAuth2 login endpoint:
POST http://localhost:8000/auth/login
Stop the helper container when you are done:
docker rm -f octopus-mongo
Everyday Developer Tasks
Testing
Run the local pytest suite with coverage:
make python-testCI-equivalent Docker run:
scripts/ci-test.sh
Linting and Formatting
Auto-format:
make python-formatLint (isort, black, flake8, pylint):
make python-lint
Docs
poetry install --with docs
poetry run sphinx-build -b html docs/src docs/_build/html
# Optional live reload (install sphinx-autobuild first):
poetry run sphinx-autobuild docs/src docs/_build/html --open-browser
Open docs/_build/html/index.html to read the rendered site. Docs cover dynamic
endpoint design, API reference material, coverage, and the changelog.
Next Steps
Dive into the dynamic endpoint system: Dynamic Endpoint Configuration
Explore the autogenerated API documentation: API Reference
Review recent changes and upgrade notes: Changelog